To dry herbs for long-term storage in a survival situation, it’s best to harvest them in the morning after the dew has evaporated. Use sharp scissors to cut the stems, ensuring to leave some for regrowth to maintain your herb supply. Wash the herbs gently and lay them in a single layer in a shaded, well-ventilated area to prevent bruising. While air-drying is a straightforward method, you can also utilize an oven set below 180°F or a dehydrator configured between 95°F and 115°F. Regularly check for crispness and perform a crumble test to ensure they are thoroughly dried. Continue reading to uncover essential tips for effective storage and practical usage in your prepper pantry.
Key Takeaways
- Harvest herbs in the morning, making sure to leave some foliage for regrowth and sustainability, which is vital for self-sufficiency.
- Utilize air-drying or a dehydrator set between 95°F to 115°F for effective drying, ensuring you have long-lasting supplies for emergencies.
- Check for dryness by ensuring leaves are crispy and crumble easily when rubbed, a crucial step for maximizing shelf life.
- Store dried herbs in airtight glass jars in a cool, dark place to preserve their quality and potency for when you need them most.
- Label jars with the herb name and storage date for easy identification and to help monitor freshness, aiding in your preparedness strategy.
Harvesting Herbs for Drying
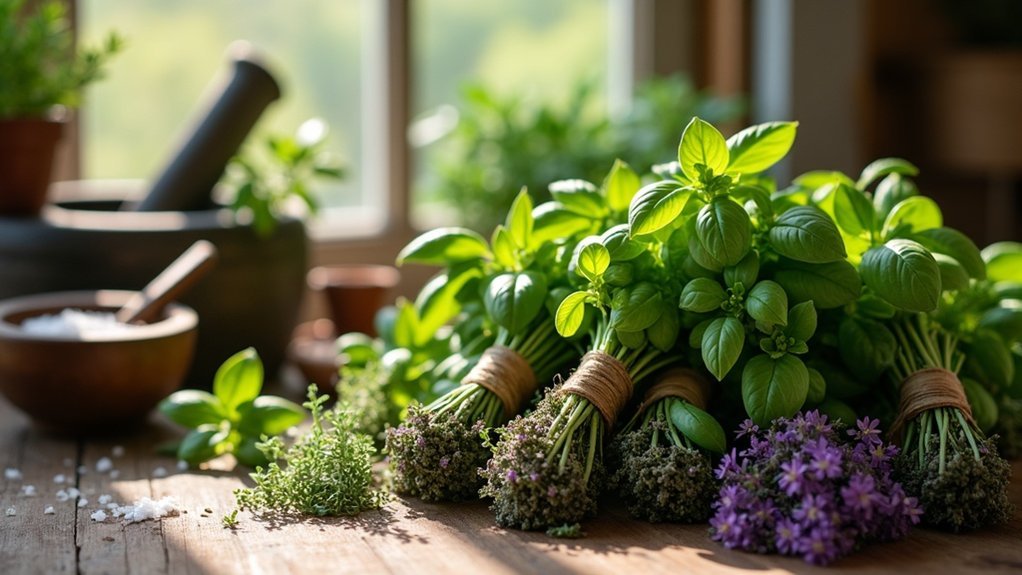
When you’re ready to harvest herbs for drying, it’s crucial to do so in the cool morning hours after the dew has evaporated. This practice not only maximizes their essential oil concentration and flavor but also ensures that you’re gathering the herbs at their peak potency for survival situations.
Use kitchen scissors or pruning shears to cut robust stems with healthy leaves close to the base, leaving some foliage for regrowth, which is important for sustainability in your herb garden. For delicate herbs like chamomile, harvest the blossoms while the petals are still tucked to maintain quality for medicinal uses.
Handle the freshly harvested herbs gently to avoid bruising, which can compromise their viability and effectiveness. Regularly harvesting herbs encourages more growth, ensuring a steady supply for your prepping needs.
Preparing Herbs for Drying
After harvesting your herbs, the next vital step in ensuring their quality for long-term storage is proper preparation for drying. Begin processing your herbs immediately to prevent deterioration. For transport, opt for paper bags or kitchen towels instead of plastic, which can trap moisture and promote spoilage. Gently shake the herbs to dislodge any insects, and wash them if necessary. Lay the herbs in a single layer in a shaded area to ensure good airflow and protect them from direct sunlight, which can degrade their potency. When dealing with roots, scrub them clean to remove any soil. Additionally, remove the lower leaves from the stems, leaving about an inch and a half bare; this facilitates better drying and preserves the herb’s essential oils.
| Step | Action |
|---|---|
| Transport | Use paper bags or kitchen towels |
| Cleaning | Shake off insects; wash if needed |
| Drying Location | Lay in the shade for airflow |
| Leaf Removal | Trim lower leaves for better drying |
Best Methods for Drying Herbs
When it comes to drying herbs for survival and prepping, you’ve got several effective methods to choose from.
Air-drying is the simplest and requires no additional equipment, making it an ideal choice for those looking to conserve resources. However, using an oven or a dehydrator can also yield excellent results if you need to speed up the process for immediate use.
Each method has its own considerations, especially in a survival situation, so let’s explore how to make the most of them to ensure you have essential herbs ready for your needs.
Air-Drying Method Explained
To air-dry herbs effectively for your survival and prepping needs, start by harvesting them in the morning after the dew has evaporated, ensuring they’re clean and free from dirt.
Next, bundle the herbs by tying their stems together, leaving about an inch and a half of bare stems for hanging. Hang these bundles upside down in a cool, dry, dark location with good airflow to prevent mold and preserve essential oils—critical for long-term storage and usage in survival situations.
For small leaves and flowers, drying them on screens or in loosely woven baskets is an efficient method.
Once your herbs are crispy and easily crumbled, they’re ready to be stored in airtight containers, ensuring you have essential flavor and nutrients on hand during emergencies.
Oven Drying Considerations
While oven drying may seem like a quick solution for preserving herbs, it’s crucial to consider several factors to maintain their quality, especially in a survival situation. High temperatures can destroy essential oils, so keep the oven below 180°F (82°C) to preserve flavor and potency.
Ensure proper airflow by cracking open the oven door during the drying process, allowing moisture to escape and preventing overheating, which is vital when resources may be limited. Using cooling racks instead of baking sheets improves air circulation around the herbs, enhancing the drying process.
Always label the oven to avoid accidental roasting, and regularly check the herbs to ensure they’re drying properly without burning. This careful approach not only helps you preserve herbs effectively but also contributes to your overall preparedness in food storage and self-sufficiency.
Using Dehydrators Effectively
Using a dehydrator is an essential skill for preppers and survivalists looking to preserve herbs for long-term storage. Maintaining the flavor and potency of your herbs is crucial, especially in a survival situation where fresh ingredients may not be readily available.
Set your dehydrator between 95°F to 115°F for optimal results; higher temperatures can compromise essential oils, which are vital for both flavor and health benefits.
Arrange herbs in a single layer on the trays to ensure even airflow and prevent clumping, which can lead to uneven drying. Keep a close eye on the drying process; fully dried leaves should be crispy and crumble easily when crushed.
After the herbs are completely dried, store them in airtight containers, preferably dark glass jars, and keep them in a cool, dry location to maintain their quality over time.
This method ensures that you can enjoy flavorful and potent herbs long after the harvest, adding crucial nutrition and taste to your meals in times of need!
Monitoring the Drying Process
As you monitor the drying process of your herbs for survival and prepping purposes, it’s crucial to keep a close eye out for any signs of mold or moisture, which could indicate improper drying and compromise your supplies. Ensure your herbs are stored in a cool, dark place with excellent airflow to prevent spoilage. If you’re utilizing a dehydrator, be vigilant about the temperature settings and the duration of the drying process. Remember, smaller leaves and flowers will dry more quickly, so inspect them more often.
| Signs to Monitor | Action Needed | Frequency |
|---|---|---|
| Mold present | Discard affected herbs | Daily |
| Moisture detected | Continue drying | Every few hours |
| Crumbling leaves | Ready for storage | Check regularly |
How to Tell When Herbs Are Fully Dried
To determine when your herbs are fully dried for survival and prepping purposes, focus on their texture and appearance.
The leaves should feel crispy and crumble easily when you rub them between your fingers, indicating they’re ready for long-term storage.
Any stems or flowers should snap rather than bend, ensuring they’re adequately dehydrated.
Regularly inspect for visual cues, confirming that everything is brittle and dry to prevent moisture-related spoilage, which could jeopardize your food supply in emergency situations.
Visual Cues for Dryness
How can you tell when your herbs are fully dried and ready for long-term storage? Recognizing these visual cues is essential for ensuring you’re storing adequately dried herbs in airtight containers, which is crucial for survival and prepping:
| Visual Cue | Description | Importance |
|---|---|---|
| Shriveling Leaves | Leaves should appear shriveled and brittle | Indicates moisture removal, preventing spoilage in a survival situation |
| Dull Color | Color should fade compared to fresh herbs | Sign of effective drying, indicating readiness for storage |
| No Mold or Odor | Absence of mold and unusual smells | Prevents spoilage, ensuring herbs remain usable during emergencies |
| Dry to Touch | All leaves must feel dry, with no spongy areas | Confirms proper drying, critical for longevity in storage |
| Snapping Stems | Stems should snap easily rather than bend | Guarantees complete dryness, vital for preserving the herbs’ potency |
These visual cues not only help prevent mold growth but also ensure your herbs are fully dried and ready for long-term storage—key for any survivalist or prepper.
Texture and Crumbling Test
While drying herbs for your survival pantry, it’s essential to conduct a texture and crumbling test to ensure they’re fully dried and ready for long-term storage.
Rub a few leaves between your fingers; they should crumble easily without any moisture remaining. Dried herbs must feel crispy and brittle, indicating that all excess moisture is eliminated, which is vital to prevent mold growth during storage.
Look for leaves that are curled and wrinkled—if they remain flexible, they require additional drying time. Regularly inspect your herbs throughout the drying process to catch any signs of spoilage, which could compromise your supplies.
Once dried, crumbling them just before use will help release their essential oils and flavors, making them a valuable addition to your meals in times of need.
Storing Dried Herbs Properly
Properly storing dried herbs is vital for survivalists and preppers to maintain their flavor and potency, ensuring you have effective herbal options when needed.
Here are essential tips for effectively storing your herbs:
- Use airtight glass jars, such as amber-colored or mason jars, to protect against light and moisture, which can degrade the quality of your herbs.
- Keep these jars in a cool, dry, dark place, like a pantry, cupboard, or a dedicated storage area, to avoid exposure to heat and humidity that could spoil your supplies.
- Label each container with the herb’s name and storage date to ensure you utilize older herbs first, preserving their quality for your emergency preparedness needs.
Regularly inspect your herbs for spoilage to maintain a fresh and reliable stockpile!
Enjoying Your Dried Herbs Year-Round
When you incorporate dried herbs into your survival cooking, you unlock a wealth of flavor and versatility that can enhance your meals throughout the year. Properly dried herbs can last up to two years when stored in airtight containers, ensuring that you have access to homegrown flavors even during challenging times. Use herbs like mint in a variety of dishes, from hearty stews to calming teas, which can be especially valuable for morale. Remember, whole dried herbs retain flavor longer than crumbled ones, so crumble just before use for maximum potency. Here’s a quick reference for using dried herbs in your prepper kitchen:
| Dish Type | Herb Recommendation | Usage Tips |
|---|---|---|
| Survival Soups | Thyme | Add early in cooking for depth |
| Emergency Salads | Basil | Mix fresh just before serving to brighten flavors |
| Herbal Teas | Mint | Steep for 5-7 minutes for soothing relief |
| Long-Term Marinades | Oregano | Combine with oil and vinegar for preservation |
| Roasted Survival Vegetables | Rosemary | Sprinkle before roasting for added flavor |