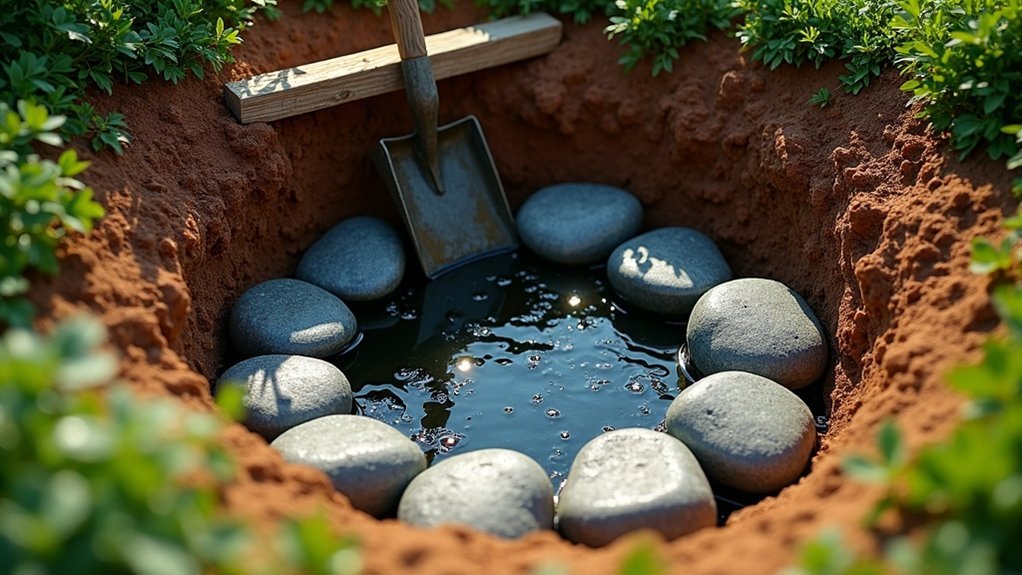
To build a dry well for drainage as part of your survival preparations, begin by digging a hole approximately 4 feet deep and wide. Line the hole with landscape fabric to prevent soil infiltration. Next, install a perforated PVC pipe with a slight pitch to facilitate drainage. Add a layer of washed gravel at the bottom and surround it with additional stone to enhance water flow. Regular maintenance is crucial to ensure the system operates efficiently. Understanding the optimal placement and specific soil conditions will further enhance your preparedness and self-sufficiency in emergency situations.
Key Takeaways
- Dig a 4-foot-wide and deep hole, ensuring it’s situated away from your home and property lines for optimal drainage, which is crucial for emergency preparedness.
- Line the hole with landscape fabric to prevent sediment from clogging the dry well, ensuring you maintain a reliable water management system.
- Install a perforated 4-inch PVC pipe with a slight pitch to facilitate water entry and drainage, allowing you to efficiently manage excess rainwater during critical times.
- Add a 6-inch layer of washed 3/4-inch rounded stone at the bottom and surround the pipe with additional gravel, creating a durable structure that will stand the test of time.
- Conduct a percolation test to ensure soil conditions are suitable for effective drainage before installation, as understanding your land’s capabilities is essential in any survival situation.
What Is a Dry Well?
A dry well is a crucial element in a preparedness strategy for managing excess water, especially in the context of survivalism and prepping. It’s designed to capture and disperse surplus water from roofs, which can be vital during heavy rainfall or flooding situations.
A dry well is essential for effectively managing excess water, especially during heavy rains or floods.
Usually made from perforated, open-bottom plastic barrels, a dry well allows water to percolate into the surrounding soil, facilitating drainage and aiding groundwater recharge—essential for maintaining a reliable water supply in emergency scenarios.
By installing dry wells, you can alleviate the strain on municipal storm drains, minimizing the risk of flooding and standing water that can attract pests or lead to contamination.
The number of dry wells needed will depend on the roof area and soil type; for instance, clay soils may require more wells to ensure adequate drainage.
Incorporating dry wells into your preparedness plan can help create a sustainable and resilient living environment, providing peace of mind during adverse weather conditions.
Steps to Install a Dry Well
Installing a dry well is a vital step in effective water management, especially for those focused on survivalism and prepping.
Begin by digging a hole approximately 4 feet wide and 4 feet deep, making sure it’s at least 10 feet away from your home’s foundation and 3 feet from property lines to maintain safety and compliance.
Next, line the hole with durable landscape fabric, securing it in place with staples to prevent sediment from clogging the drainage system.
To facilitate water flow, install a 4-inch-diameter PVC pipe that connects your downspout to the dry well, ensuring it has a 1/4 inch per foot pitch for optimal drainage.
Assemble the dry well following the manufacturer’s instructions carefully. Start with a 6-inch layer of washed 3/4-inch rounded stone at the bottom of the well.
Surround the dry well with additional stone to enhance water dispersal and prevent flooding, ensuring your homestead remains resilient during heavy rainfall or emergencies.
Materials Needed for Installation
Before embarking on your dry well installation, it’s crucial to gather the appropriate materials to ensure efficiency and readiness for any situation.
The following key components will help you establish a reliable drainage system that can be vital for survival:
- Perforated PVC pipe (4 inches in diameter) for water entry and management
- Landscape fabric to prevent soil clogging and maintain soil integrity
- Gravel or crushed stone to facilitate effective drainage and prevent flooding
- Plastic or concrete barrel for the dry well structure, providing durability and resilience
- Tools: shovel, level, measuring tape, and possibly a small excavator for digging the hole
Having these materials on hand before you start won’t only streamline the installation process but also enhance the functionality of your dry well, making it a valuable asset in your prepping strategy.
Maintenance and Care
Once you’ve gathered all the necessary materials for your dry well installation, it’s crucial to prioritize maintenance and care to ensure its long-term functionality, especially in a survival situation.
Inspect the dry well at least once a year, preferably before the rainy season, to ensure it’s free from debris that could hinder its performance. Regularly clean the downspout and surrounding area to prevent clogs that can lead to water pooling—a potential hazard in an emergency scenario.
Check for signs of erosion or settling around the dry well, as these may indicate ineffective water dispersion that could compromise your water supply. Periodically flush the system with water to verify drainage and clear any minor blockages.
Address any pooling issues promptly to maintain efficiency and ensure that your water management system remains reliable when you need it most.
Will a Dry Well Work in Your Yard?
Determining whether a dry well will work in your yard is crucial for effective water management, especially in a survivalist or prepping context. To assess its viability, evaluate several key factors that can impact your water drainage and overall land utility.
Start by conducting a percolation test; if the water level drops 1 inch within three minutes, your drainage conditions are favorable for a dry well. Here are essential considerations:
Conduct a percolation test; if water drops 1 inch in three minutes, your yard is primed for a dry well.
- Soil Composition: A mix of coarse and fine particles is ideal, as it promotes efficient drainage while retaining some moisture for potential gardening needs.
- Installation Depth: Aim to dig a trench around four feet deep; this depth enhances performance and helps manage runoff effectively.
- Water Table: Ensure the water table isn’t too high, as this can hinder the dry well’s functionality, making it less reliable in times of need.
- Existing Drainage Systems: If you have French drains or other systems in place, consider how they can work in conjunction with a dry well to optimize water management.
- Surface Water Accumulation: Identify areas in your yard that are prone to standing water. These are prime locations for placing a dry well to enhance drainage and prepare your property for various weather conditions.
Incorporating these considerations will help you create a more resilient and self-sufficient yard, crucial for any survivalist or prepper.